“Envelope Basics: Seams” is part of an occasional series titled “Envelope Basics” that provides an in-depth look at all-things envelopes—elements, measurements, ordering tips and more*.
As a mail professional, you have a lot going on during the day. You’re a quality manager, USPS® specifications expert, traffic controller, predictor of the unpredictable, and potentially, these activities are in addition to your main role. Some days, you may feel like you’re coming apart at the seams.
We understand what a busy day looks like. And we’re here to help you keep it together with an overview on something that keeps your mail together: envelope seams.
Which Seam is Right for Me?
Envelope seams are determined by the type of envelope (e.g. open end or open side), quantity made, selected printing options and the manufacturing process used by your envelope manufacturer. Let’s take a closer look at these determining factors on double and single envelope seam options:
Double Seam Envelopes
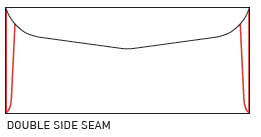
Double Side Seam: Side seams run vertically along the back or insertable side of an open side commercial or business envelope. These seams tuck underneath both sides of the back panel of the envelope and are often called double side seams.
Double side seams are ideal for printing transpromotional messages or copy on the outer envelope to help cross-sell, up-sell, reinforce brand or reinforce messaging that occurs on inserts inside the envelope. Side seams can be manufactured on either web or die cut converting equipment (for smaller quantities).

Diagonal Side Seam: Fitting to their name, diagonal side seams run diagonally across the back or insertable side of an open side envelope to the top of the throat. They are manufactured on die cut equipment, which is an ideal manufacturing process for smaller order quantities of under 100,000 envelopes. Baronial/announcement and bankers envelopes feature diagonal side seams. Diagonal side seams are not recommended for printing on the back of the envelope, as the ink can overlay too heavily on the seams.
Single Seam Envelopes
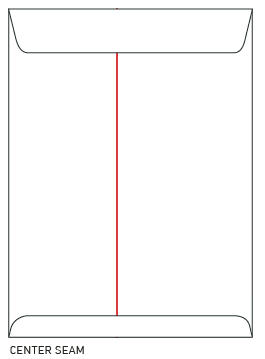
Center Seam: Center seams are found on open end envelopes, such as catalog, policy or coin envelopes. The center seam provides added strength to the envelope for heavier inserts such as thick insurance policies or annual statements. Larger open end center seam envelopes are not ideal for automatic insertion.
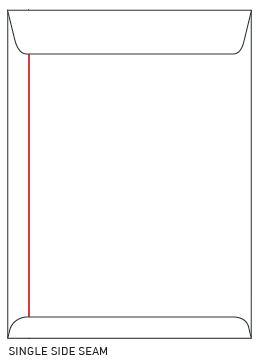
Single Side Seam: Also seen on open end envelopes, the single side seam can be placed either on the left or right of the insertable side of the envelope. Similar to the double side seam, a single side seam allows for a larger printing area on the back or insertable side of the envelope. Larger open end side seam envelopes are not ideal for automation insertion.
Download Our Guide
Envelope Basics is a complete guide that details everything you need to select, measure and order the right envelope for your mail campaign.
Whether you’re a seasoned mailer or new to the mail industry, Envelope Basics includes helpful tips for your business or organization. Download your copy of Envelope Basics here.
Seemingly, part of your success lies with the ability to create more hours in the day. In the absence of that, some of it lies within seam knowledge. Contact us today and speak with a Tension Sales expert about seam options for your next campaign.
*This blog is intended for informational purposes only. Exact envelope specifications should be discussed in detail with your Sales Representative.